CM-Cabinets Library User Guide
Standard assumes the drawer box (including the sides) is entirely made of board material.
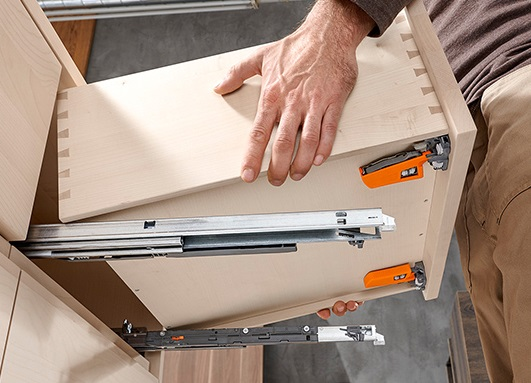
Example of Standard drawer runner
Standard = Box drawers with ball bearing runners or under-mount runners.
The Standard runner tables can be found in <your CabMaster folder>\Table\DrawerRunners\
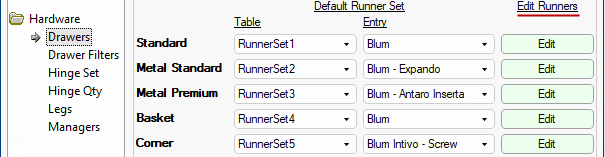
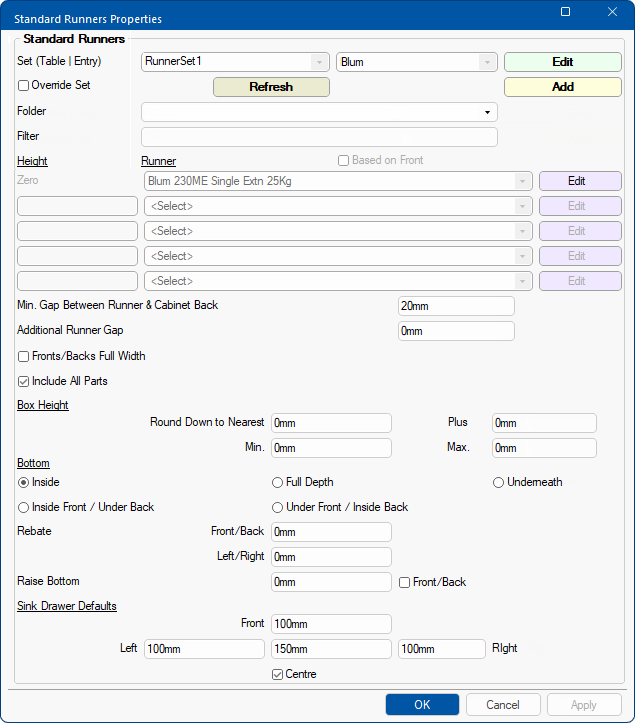
Construction rules pertaining to Standard drawer boxes are set using the Standard Runners Properties dialog which is accessed by clicking on the applicable Edit button on the Hardware > Drawers page of the Catalog/Drawing Properties.
To locate information about any part of the following image,  click on the area of interest.
Sink Drawers are applicable for all types of drawers, i.e. Standard, Metal and Premium have the table options and can be adjusted on each cabinet (options on Drawers page and Sink Drawers page) , even though the defaults values are only on the Standard Runners Properties page.
Set (Group | Series) drop list is available if Override Set is turned Off, as shown.
- The selected Runner Set can be changed using the Edit button;
- Create a new Runner Set using the Add button;
- There can be any number of sets of runners for each Drawer Runner group, along with the heights at which they should be used (up to 5 runners per set).
Folder and Filter tools are available if Override Set is turned On, to aid in selection of available runners.
See discussion on Search by Folder/Filter.
See discussion on Runner Sets.
If changes are made, use the Refresh button to ensure that the changes are applied to the current drawing. (When a new drawing is started, the default will automatically refresh to the latest).

Override Set - Click to Expand
To override the default runner set tick the Override Set check box, as shown, allowing you to:-
- Change the runner table for each Height by using the drop list to select available runners.
- Amend each related runner table by clicking the Edit button, which opens the Runner Editor.
- Once a runner is selected, the editor allows selection of the runner lengths from a drop list.
- The settings for each runner length can then be adjusted and saved.
- Saving can be done for just the selected length or the same value can be saved for all lengths.
- There are separate areas for adjusting Construction or Pricing details.
See discussion on using the Runner Editor and tutorial on Pricing Drawer Runners.

Min. Gap - Click to Expand
This can be changed on the...
- Hardware > Drawers page of the Drawing Properties (click on image above); or
- the Runners Properties dialog (click on image above) or
- you can Override at Cabinet level.
The drawer 'Depth' by default is the interior depth of the cabinet minus 'Min. Gap Between Runner & Cabinet Back'.
You can also specify additional Drawer Mechanism Gaps.
Override Min. Gap at Cabinet Level
It is possible to override the 'Minimum Gap' option set here in the Catalog/Drawing properties at Cabinet level, as shown.

Override Min.Gap at Cabinet Level - Click to Expand
The width of the drawer box can also be determined by the selection made in the Runner Editor > Gap.

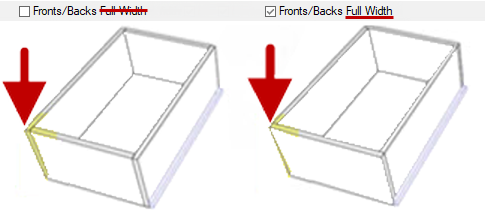
Fronts and Backs Full Width - Click to Expand
The effect of the Fronts/Backs> options, checked and unchecked, are shown on following image.
Include All Parts is not related to the Full Width option. It is used to specify whether all parts of the drawers are to be included in the export of the drawer to the machine or report.
The shape of the parts using the machining are shown in the cabinets preview pane (click on image). If you uncheck this option the drawers disappear.

Click to view Cabinet Details and Preview Pane

Box Height - Click to Expand
There are 3 ways to control the height of Standard Drawers (3rd way relevant to these options)...
- Height specified in the runner table.
- The maximum height available for the drawer taking any required gaps into account.
- After the maximum height available is calculated (see 2), it can be Rounded Down to Nearest multiple of the given value, then have an amount added using Plus.
- The Min and Max are used in conjunction with the others.
Option 1: Useful if you use ready made drawer boxes that are available in regular height increments e.g. 104mm, 114mm, 124mm, 134mm etc
- If the maximum calculated space was 127mm.
- Rounding Down to Nearest 10mm would give 120mm then adding 4mm would give 124mm.
Option 2: Useful for when ready made boxes come in a predefined range e.g. smallest is 104mm and largest is 404mm.
- If Max is 400mm and the height available is 457mm.
- Rounding Down to Nearest 10mm would go to 400mm instead of 450m.

Bottom - Click to Expand
Base Position (or Bottom) options Inside, Full Depth or Underneath defines the construction of the drawer box, with regard to the Bottom (Base). These are defined as...
- Inside - fully inside the sides, front and back (required for Dovetail construction) or
- Full Depth - inside the sides but below the front and back or
- Underneath - below the sides, front and back.
- When not below them, the base can be rebated into the Front, Back and/or Sides at a given height above the bottom of the drawer.
- Inside Front / Under Back - see example.
- Under Front / Inside Back - see example.
Example Front/Back
This shows the difference between the 'Inside Front / Under Back' and 'Under Front / Inside Back' radio button options.
In some cases two different construction methods are required within the same drawing (such as making pot drawers from whiteboard and also making timber drawers using Hettich Quadro* runners).
Settings in the drawer runner table override the default settings in the drawing properties.
Extra Notes: Dovetail
Dovetail machining is only available on standard drawers.
An optional column "Dovetail" can be added to any standard drawer runner table. It is assumed that...
- the Ends (front and back) are both full width, with the sides between them
- the Bottoms are fully inside (inside both Ends and Side)
- the Bottoms are Rebated into both Ends and Sides
- no parts are Edged
Any columns in the table that try to construct the drawer in any other way will be ignored. However, the depth of the Rebate for the Bottom and its' Recess up into the drawer box can be set in the usual way.

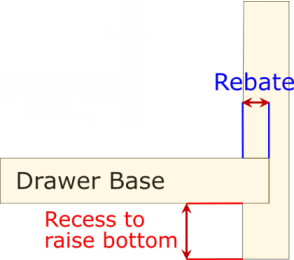
Rebate and Raise Bottom - Click to Expand
Rebate allows you to rebate Front/Back and between (inside) the Sides.
The only exception to this is on a Tall standard pantry on the Drawers2 page where there is an option for the Fronts/Backs to be made Full Width.

Drawers2 page option - Click to Expand
Raise Bottom allows the bottom to be up inside the front, back and sides (i.e. not flush with the bottom).
- This is also known as a gap and can also be controlled in the Runner Editor - See BaseRecess.
Raise Front/Back raises the front and back ends along with the base
- Only applicable when the Bottom option of the drawer is set to Inside, discussed above.

Sink Drawer Defaults - Click to Expand
The sizing of sink drawers can be set here in the Drawing Properties and overridden on the cabinet on the Sink Drawers page.
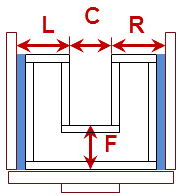
- The Left (L) and Right (R) are from the inside edge of the Carcass (thereby including the runner mechanism) to the edge of the central void (thereby including any inner drawer sides).
- The Centre (C) void is between the mid drawer sides.
- The Front (F) is from the very front of the drawer box (including any front component) to the back of the mid back.
- Back Width Gap- a positive value shrinks the width of the drawer back ends, while keeping the same width of the sink cutout's front end.
- Mid Back Gap Width - a positive value shrinks the width of the front end of the sink cutout.
Sink Drawers are applicable for all types of drawers, i.e. Standard, Metal and Premium have the table options and can be adjusted on each cabinet (options on Drawers page and Sink Drawers page) , even though the defaults values are only on the Standard Runners Properties page.
Each applicable drawer cabinet has a Sink Drawer page which allows editing of sink drawer properties, provided fixed values are not set in the drawer's definition table.
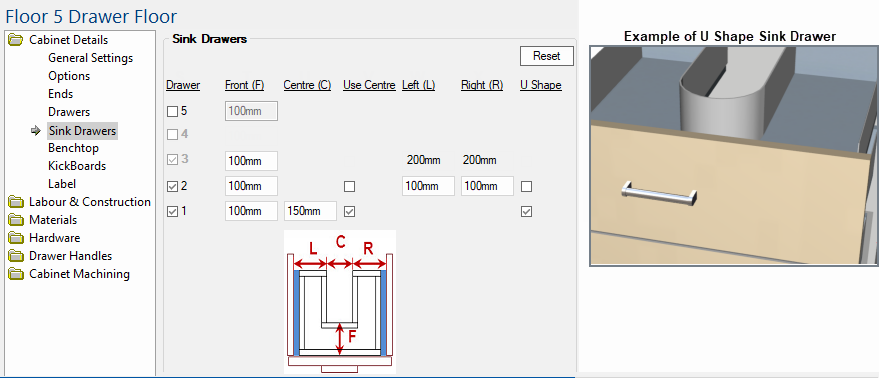
Image: Cabinet Details > Sink Drawers page (Click to view)
The image of Sink Drawers page for a 5 drawer cabinet.
A row will appear for each drawer, allowing each drawer to be edited separately.
| Options |
Explanation of options on the Sink Drawers page |
| Sink Drawer |
Available - when drawer is a Standard drawer box but not set as a Sink drawer. Greyed out and unchecked - if either the drawer is metal or metal premium that is not set as a sink drawer in its definition table Greyed out and checked - if the drawer is set as a sink drawer in its Runner Editor options (StdCat=5) |
| Front Depth |
Blank - when not a sink drawer Editable - when a sink drawer with the Front Depth set as a negative value (flexible front depth) in the drawers' definition table. Not Editable - when set as a fixed value is fixed value in the drawers' Runner Editor options. |
| Centre Width |
Blank - when not a sink drawer or the value for the side widths are in use (either from the table or 'Use Centre' being unchecked) Editable - when the definition table has the side widths set to zero (or less) and 'Use Centre' is checked. |
| Use Centre Width | Blank - when not a sink drawer or if the side widths are set (greater than zero) in the Runner Editor options. |
| Left & Right Side Width |
Blank - when not a sink drawer or 'Use Centre' is checked. Editable - when 'Use Centre' unchecked or no fixed value in the drawers' Runner Editor options. Not Editable - when a fixed value is found in the drawers' definition table. |
| Use U Shape |
Typically the cutout in the drawer for the sink plumbing is rectangular (as in the diagram above) and has three pieces of board to box it. However, it is possible to manufacture with a single flexible plastic insert to box it in, which requires a U shaped cutout. |
Materials-Advanced category of the Catalog/Drawing properties allows you to select the drawer box material for each part of the drawer e.g. from the applicable page, as in this example, you can select the Board materials for the drawer box carcass on the Carcass page.

Materials-Advanced category
These options are then reflected on the Materials-Advanced > Drawer Standard page, as shown below. On the Drawer Standard page a different material can be used for the drawer base when a drawer is marked as being an 'Alt Drawer Base' such in the requirement for a Potdrawer.
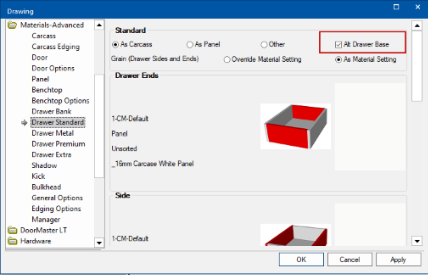
Drawer Standard page allows for selection of Alternate Base